Setup
Before we start, register for the project using the registration tool.
Engine Changes
Our engine library has once again been updated with a lot of new functionality. Like last week, we’ll go over the changes that were made to the engine. As always, We encourage you to follow along by reading the relevant files as you read the guide. We also highly recommend you to read the engine changes in its entirety before writing any code for the demo.
It might seem like there’s a lot of info being thrown at you this week, but don’t worry! You’ll have lots of starter code to work with, and remember that we’ve implemented all (but one) of the library functions for you.
We have added two new code quality items that we will start checking:
functions::library-improper-usagefunctions::library-reimplementation
Please consult the code quality document for more information on these items.
forces.h
This week we’ve added forces, allowing us to finally support physics! Although you
won’t be using physics forces in this week’s demo, this information will be very helpful
if you decide to include physics in your final game — which is very likely (Note
that physics forces is bolded–you still have to use forces.h this week so
don’t skip this section!).
forces.h is relatively straightforward. By passing in a scene, bodies, and
sometimes a constant, you “register” a force creator in the scene that will
cause the bodies to interact with each other in some way. The nice thing about
encapsulating forces this way is that you don’t have to worry about how the forces
are registered by the scene–we have implemented all the logic that does this for you.
The documentation of the functions is all you need to understand how to use them.
body_t
info
Different applications will need to use different extra information about bodies. For
example, for the Space Invaders demo that you will write this week, you will need
to be able to differentiate between the player and enemies. Thus, we’ve added auxilliary data to the body as a void *,
which can be accessed via body_get_info.
This means there is extra information to pass into body_init, so we’ve created
a second constructor, body_init_with_info, that includes a value for the void *.
Since the actual info struct is left up to the user, the body_t constructor also
takes in a info_freer function that is used (if non-NULL) to free the info when body_free is
called. This follows the same logic of the changes we made to list_t last week.
Forces and Impulses
body_add_force and body_add_impulse are called by force creators when they
want to affect bodies–you won’t and shouldn’t have to use these functions.
body_remove and body_is_removed have been introduced this week to support
body removal. body_remove flags a body for removal, and body_is_removed returns
this flag. We’ll elaborate on why these functions are necessary in the section below.
scene_t
Since we’ve introduced forces this week, we’ve had to accomodate them by
making changes to scene.h.
force_creator_t is a typedef for force functions. scene_add_force_creator
uses it to manage, you guessed it, forces. These are both used under the hood
in our implementations of scene and forces. As a result, you don’t have to
worry about them.
Delayed Body Removal
Giving the scene access to the relationship between bodies and force creators allows it to take ownership of managing their lifetimes. That is, the scene can now be responsible for actually freeing the bodies and removing the force creators from itself.
This gets very convoluted very quickly if we attempt to have the force
creators do this work; so, we’ll employ another design pattern: delaying action.
We will make scene_tick responsible for actually doing the removal at the end.
This is where body_remove comes in: body_remove “sets a flag” to indicate
that it is ready to be deleted by the scene rather than immediately actually deleting itself.
Consequently, we’ll need to deprecate the old function scene_remove_body.
Library writers can mark functions as “deprecated” if they should no longer be
used, but they still need to exist for backwards compatibility. All
body removals should be done with body_remove moving forward. To support
backwards compatability, we’ve modified scene_remove_body
so that it uses body_remove instead of actually removing the body from the list of bodies.
In summary, scene_tick does the following:
- Goes through all the force creators and applies them onto bodies, potentially marking some bodies for removal.
- Goes through all the bodies that are marked for removal, and removes any force creators that are supposed to act on them.
- Actually removes and frees the bodies that have been marked for removal.
Again, this has all been done under the hood for you, so you don’t need to
worry about how scene_tick is implemented, but it’s still good to know what it does.
color_t
We’ve added a color_is_equal function that compares two colors.
sdl_wrapper
arrow_key_t supports the space bar as a keypress.
state.h
emscripten_main now returns a bool indicating whether the game/demo is over.
If it returns true, the window is closed, signaling to the user that the game/demo
is over.
vector.h
We’ve added a vec_get_length function that returns the length of a vector.
Deliverables
This week, you will implement collision detection. Once you’ve done that, you’ll use it to implement a basic version of space invaders!
Collisions
We’ll start with collision detection, i.e. checking if two polygons intersect. For simplicity, we will assume the polygons are convex. You must implement the separating axis method to check for collisions:
Check if there is a line that separates the polygons, putting one polygon on each side of the line. This method will require minimal modifications to implement collision resolution next week, since it already computes the direction that the polygons bounce off.
Separating axis
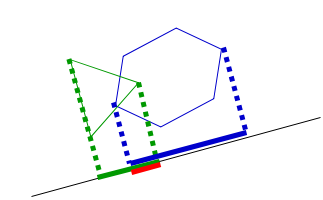
Aside: Projection
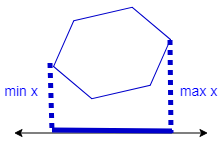
The projection of a polygon onto a line is the line segment containing the projections of all points in the polygon onto the line, shown as the thick blue line below. For example, if the line is the x-axis, the projection of the polygon is the segment from the minimum x value of any vertex to the maximum x value of any vertex.
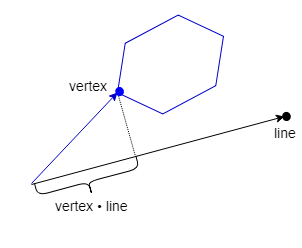
The projection of a vertex onto a general line can be found by the dot product of the vertex with a unit vector pointing along the line, since that computes the component of the vertex in the direction of the line.
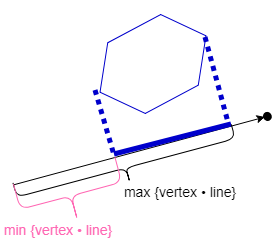
To find the projection of a polygon onto a line, we compute the dot product of each vertex with the line’s unit vector and take the minimum and maximum values.
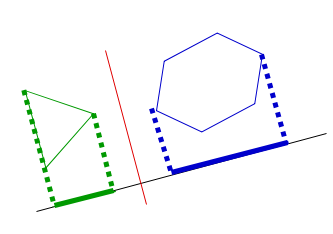
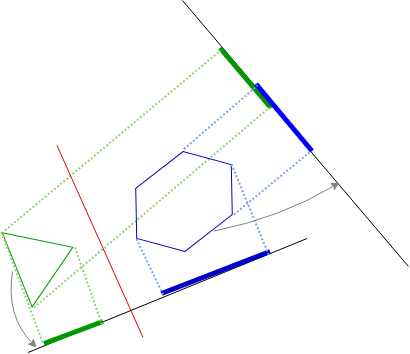
Separation
Two polygons do not intersect iff the projections of the polygons onto some axis (black) do not overlap. The red line perpendicular to this axis is a separating axis: the axis splits the plane with one polygon on each side.
Two polygons intersect iff the projections of the polygons onto all axes overlap. The red line shows the overlap.
It is not sufficient to check a single axis, since every pair of polygons has some axis where their projections overlap. However, if there is a separating axis, then without loss of generality, there is a separating axis perpendicular to an edge of one of the polygons. For example, if one polygon has 3 sides and the other has 6, we need to check 9 axes (those perpendicular to the 9 edges) to be sure the polygons intersect.
If the projections of the polygons onto one of those axes do not overlap, you should conclude that the polygons do not intersect and skip the other axes. If the polygons are far apart, then their projections onto most axes will not overlap and this algorithm will quickly determine that they do not intersect.
An example with all axes drawn (from http://www.dyn4j.org/2010/01/sat/):
An example where some projections overlap, but others do not such that there is a separating axis (red):
For more information see http://www.dyn4j.org/2010/01/sat/ or https://gamedevelopment.tutsplus.com/tutorials/collision-detection-using-the-separating-axis-theorem–gamedev-169.
Collision Implementation
We know collision detection is complicated, so we’ve provided you with a few
helper functions and helpful hints in collision.c. Once you’ve understood the
algorithm, read over collision.c in its entirety
before you start coding. This will make coding it a lot easier.
If you are looking for a really small number to use, use -__DBL_MAX__ instead of __DBL_MIN__!
Task 0.
Implement get_max_min_projections and compare_collision in collision.c,
replacing the TODOs with your code.
Once you’re done, run
make test. All tests must pass in order to receive full credit.
Note that make test only runs test_suite_collision.c;
the other tests have been kept in case you want more context on how we’ve previously
tested the other files (they would all pass since we have implemented them for you).
Demo
The demo this week is a simple version of Space Invaders. Note that the last video has been sped up 2x.
Your game demo must have the following features (but feel free to play around and implement anything you want otherwise):
- There must be several rows of enemies that move in approximately the same way as our demo (that is, across the screen, then down a “row” repeatedly)
- Both the player and the enemies must shoot projectiles at each other (the enemies automatically/randomly, and the player when the space bar is pressed)
- The player must move back and forth based on presses of the arrow keys
- The player must wrap around the screen horizontally if it leaves the window
- The demo should stop when (1) the player is shot, (2) the player clears all space invaders, or (3) the space invaders ‘fall’ below the ground.
This demo may lag a lot if compiled with asan. If you want to run it without asan, please run the command make NO_ASAN=true demo, instead of the regular make demo, or else you may experience demo slowdown.
We’ve given you starter code for some functionality. Here are also some hints for how to approach the demo:
Collisions
You will need to use some sort of destructive collision. forces.h wil give you a
helpful function to use. Note that it depends on your collision detection code
to work properly!
Body “info” field
To differentiate between the player and enemies, you will want to set and retrieve
the info of their bodies. We’ve given you an example of how to do so in make_bullet,
but feel free to change your info to whatever makes the most sense for you.
emscripten_main
To end the game, you will need to return true from emscripten_main.
Look at emscripten.c to see how it’s being used.
This will be relevant to your win/loss conditions this week.
color_is_equal
We’ve implemented a a new function color_is_equal for you to see if two colors are equal.
It may or may not be useful depending on how you implement the demo.
Task 1.
Fill in the TODOs in spaceinvaders.c, and feel free to write other helper
functions as needed.
To test the demo, make demo (or make NO_ASAN=true demo to reduce lag).
Once you’re done, make sure to push your code onto Gitlab!